Last Updated on May 9, 2025 by SPOTKEYS
How To Screenshot Dell Computer / How to Take a Screenshot on Your Dell Laptop or Desktop
In this digital age, it is essential to know how to take a screenshot on your Windows computer. Whether you want to capture a funny meme, save important information, or troubleshoot technical issues, knowing how to take a screenshot can be a lifesaver. However, not all computers are created equal, and the process of taking a screenshot may vary depending on the brand. If you own a Dell laptop or desktop and find yourself struggling with this task, don’t worry! In this article, we will walk you through the steps of taking a screenshot on your Dell computer like a pro.
Locating the Necessary Keys
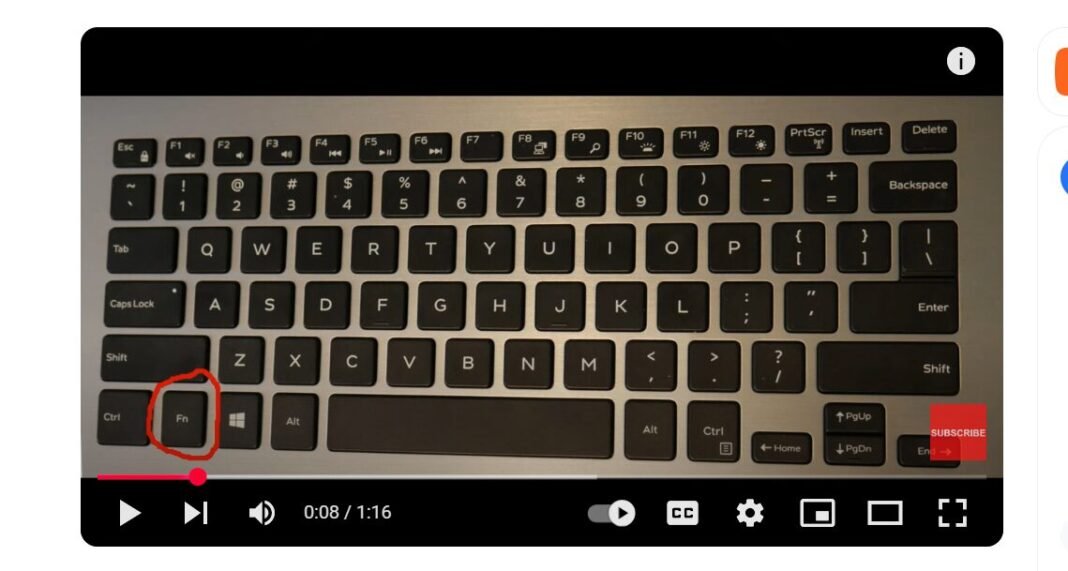
Before we jump into the process of taking a screenshot, let’s familiarize ourselves with the keys involved in this task. As shown in our video tutorial, you will need to locate three keys on your Dell keyboard: the Function (Fn) key, Windows key, and Print Screen (PrtScn) key.
The Fn key is usually located at the bottom left corner of your keyboard, while the Windows key is typically found between the Ctrl and Alt keys. The Print Screen key may be labeled as “PrtScn” or “Print Screen” and can be found at the top right corner of your keyboard.
Taking a Screenshot: Method 1
To take a screenshot using Method 1, follow these steps:
- Locate the content you want to capture on your screen.
- Once you’re ready to take the screenshot, hold down the Function and Windows keys simultaneously.
- While still holding down these two keys, press the Print Screen key.
- You will know that the screenshot was successfully taken when your screen dims for a brief moment.
- To view your screenshot, double-click on the file folder and go to Pictures > Screenshots.
Taking a Screenshot: Method 2
If Method 1 doesn’t work for you, don’t worry. Follow these steps to take a screenshot using Method 2:
- Locate the content you want to capture on your screen.
- Hold down the Function key, followed by the Windows key and Print Screen key at the same time.
- Let go of all three keys simultaneously.
- Your screen will dim momentarily, indicating that the screenshot has been captured.
- To view your screenshot, double-click on the file folder and go to Pictures > Screenshots.
Troubleshooting: What To Do If It Doesn’t Work
If you find yourself having difficulty taking a screenshot using either of the two methods mentioned above, don’t worry. Here are a few troubleshooting tips that may help:
- Make sure you are pressing down on all three keys simultaneously.
- Try holding down the keys for a longer duration.
- If you have a wireless keyboard, try replacing the batteries.
- Restart your computer and try again.
Bonus Tips:
- Did you know you can also take a screenshot of just one window instead of the entire screen? To do this, click on the window you want to capture and use either of the two methods mentioned above. This will save you from having to crop your screenshot later.
- If you want to take a screenshot of a specific area on your screen, you can use the Snipping Tool. Simply type “Snipping Tool” in the search bar and follow the prompts to capture the desired area.
Conclusion
Taking a screenshot on your Dell laptop or desktop is a simple task once you know which keys to use. With our easy-to-follow tutorial, you can now take screenshots like a pro and save yourself from frustration in the future. We hope this article has been helpful, and if you have any questions or suggestions for future tutorials, please leave them in the comments below. Happy screenshotting!


